We are looking for sales offices in the European countries
We are looking for sales offices in some European countries for the fencee brand - energizers of electric fences. If you are interested in cooperation, contact us at info@fencee.eu or leave us a message via the form, we will get back to you.
Find out more about options on installing our device for remote monitoring of electric fence parameters.
If you are thinking of purchasing our device for remote control and monitoring of the fence voltage, read this article dedicated to the different options for connecting to the Monitor. With correct use, you will have more time for your favourite activities always knowing with relief that your electric fences are in the best condition.
Think of a suitable label
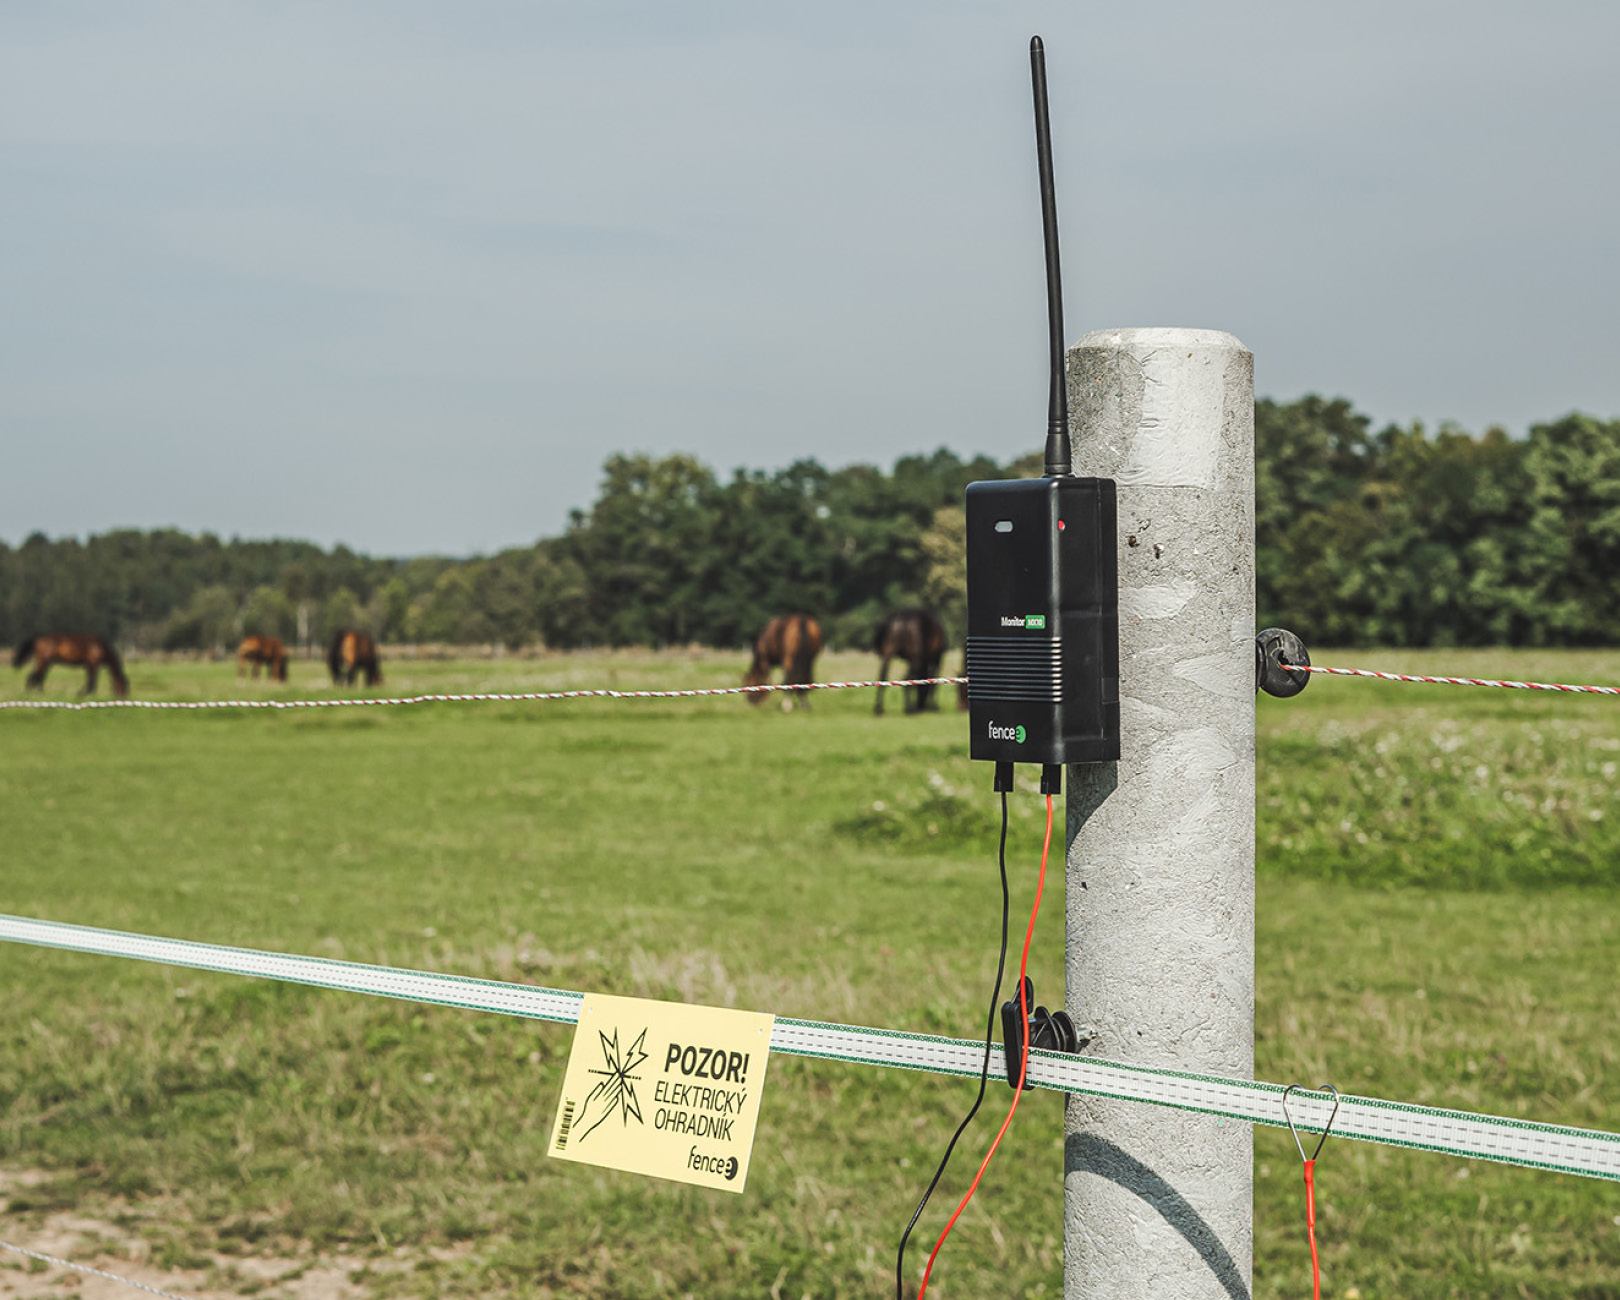
If you plan to use several monitors and use them to their full potential, it is essential to correctly label each installed Monitor MX10. When an alarm is triggered, you will immediately know by name the fence section in which the problem occurred (e.g. "Forest Monitor" or "Guard 2"). Consequently, you will know straightaway where to go and thus not having to spend a lot of time searching the entire fence. Connecting the monitor to the fence is quick and easy, using a connecting cable with a FASTON connector and a handy terminal that you simply attach to any fence wire. A magnet is used to control the monitor, when the monitor confirms its status with an audible signal. This way you avoid having a passing tease turning off your monitor. The device was developed to achieve minimum feasible energy consumption owing to the exceptional battery lifespan of 1 year.
Control Monitor MX10 connected to the electric fence
The number of Monitors connected to the fence is not restricted; however the numbers are given by the capability of the FENCE GATEWAY GW10 central device, which enables connection of up to 6 devices, while the smarter FENCE WiFi GATEWAY GW100 central deviceenables connection of up to 12 devices. Accordingly, if you have two GW100 central units, you are able to easily connect 20 or more monitors. It all depends on the free slots in the central gateway.
Ways to use Monitor
The Monitor may be installed onto the fence and used in different ways. The following lines depict and explain the most common connection variants.
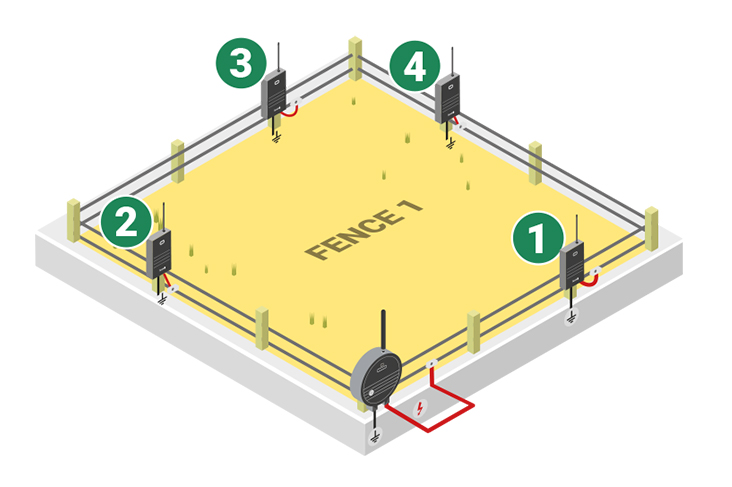
1. Standard installation
A common way to use the monitoring device is to install several monitors in a single fence, which then may be divided into several sectors. A useful solution, particularly if the fence is longer. We recommend placing the monitors in less accessible and more distant locations. In the event of drop in fence voltage, the particular monitor will flag an alarm and you will be immediately aware that the fault in the fence occurred in the section with the control monitor under the given name e.g. "Guard 2". Consequently, you will quickly find out the section in which the problem occurred without the need to searching the entire fence. For each monitor, the voltage limit may set for triggering the alarm.
Standard installation of monitoring device
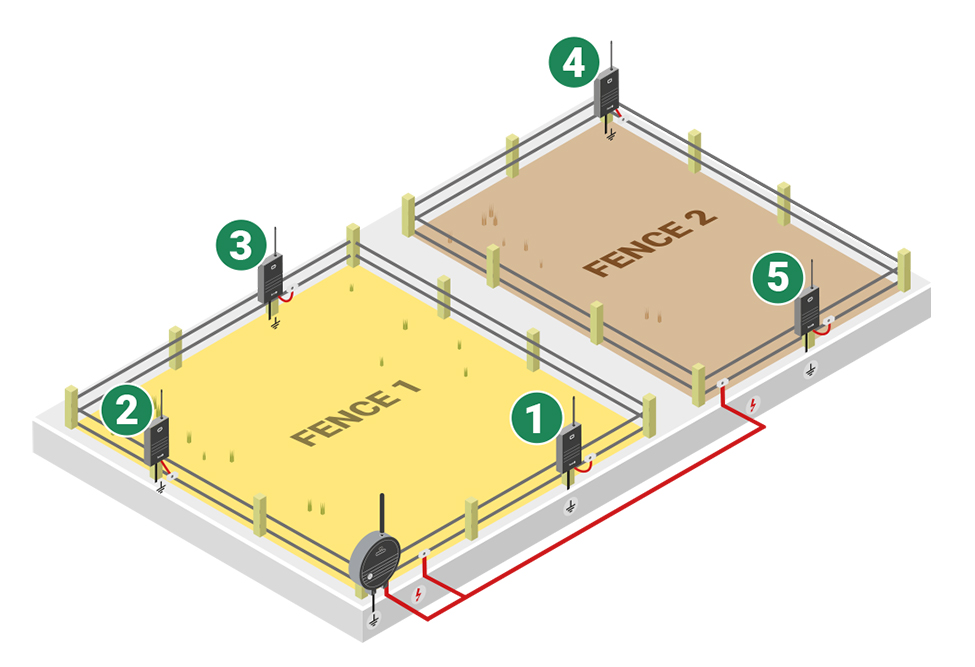
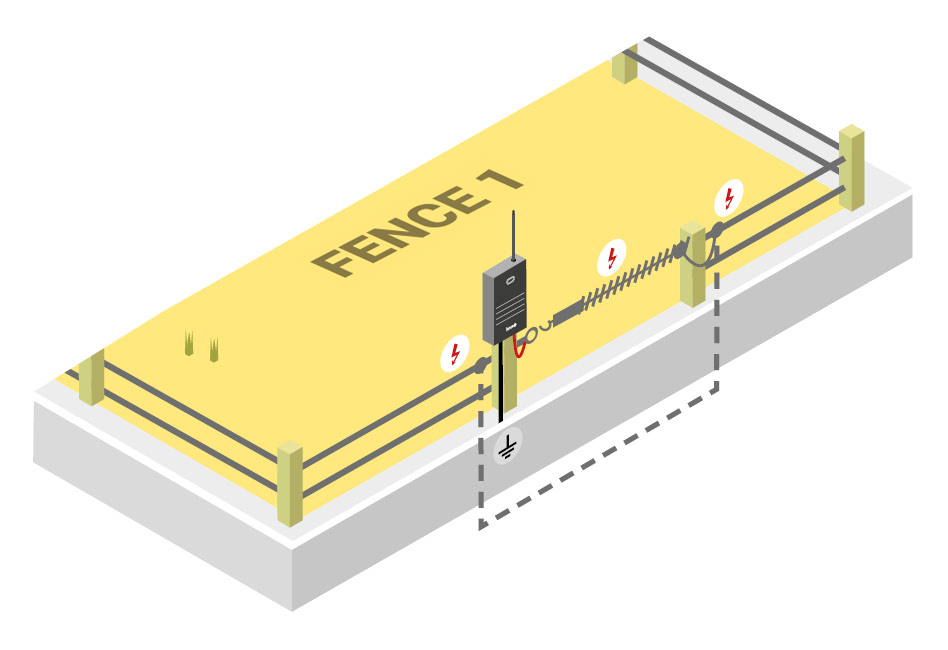
2. Installation in problem locations and at entrances
Another option for connecting monitors may be installation at entrances to the fence and in problem locations. If the energizer supplies power to several fences, then you will have an overview of each fence where the monitor is installed. If an alarm is triggered then you will immediately find out in which fence the voltage drop occurred. Install the monitors in locations where problems frequently occur, namely near forests where wild animals may damage wires or in locations near water. If the water level rises and comes into contact with the wire, the monitor will issue an immediate alert due to the consequent voltage drop.
Installation at entrance to the fence and at critical locations
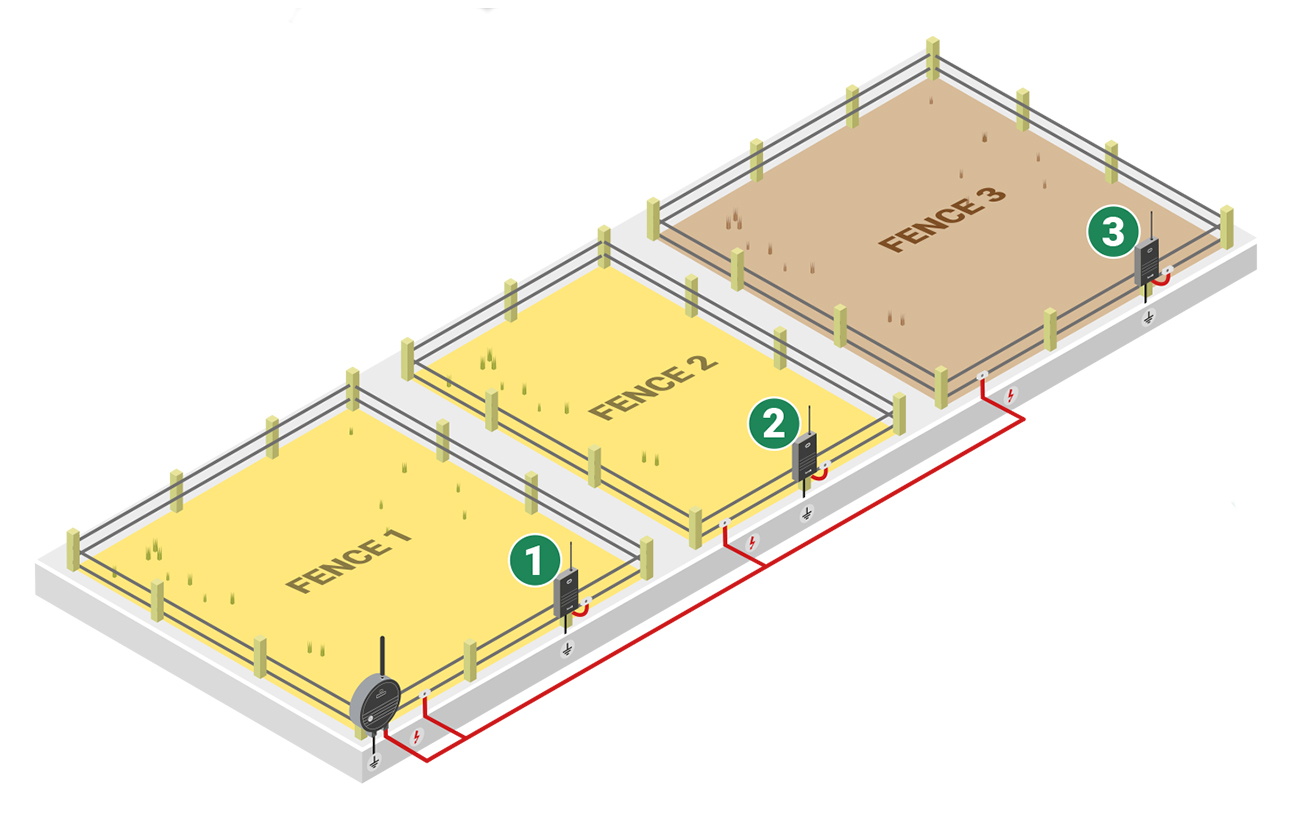
3. At entrance to a fence
If one power supply source is used to, say, power three fences, then install control monitors at the entrances to the fences. This will enable you to quickly find out in which fence the alarm was triggered, without wasting time searching. Accordingly, you will have an overview of each fence.
Illustration of installing monitors at entrance to a fence
4. Checking gate closure
Do you have your paddocks near the pathways or roads? How often did it happen that tourists did not close the gate? We have a solution for you, namely connecting the monitor onto the gate´s round insulator eyelet. After the gate is open, you will know that the eyelet for hooking the handle is without voltage. The monitor responds immediately and contacts the central gateway, which sends you notification of the situation. If this arrangement is used, it is advisable to connect the fence with a high-voltage cable.
Connecting monitor for checking whether the gate to the fence is closed
How does it all work?
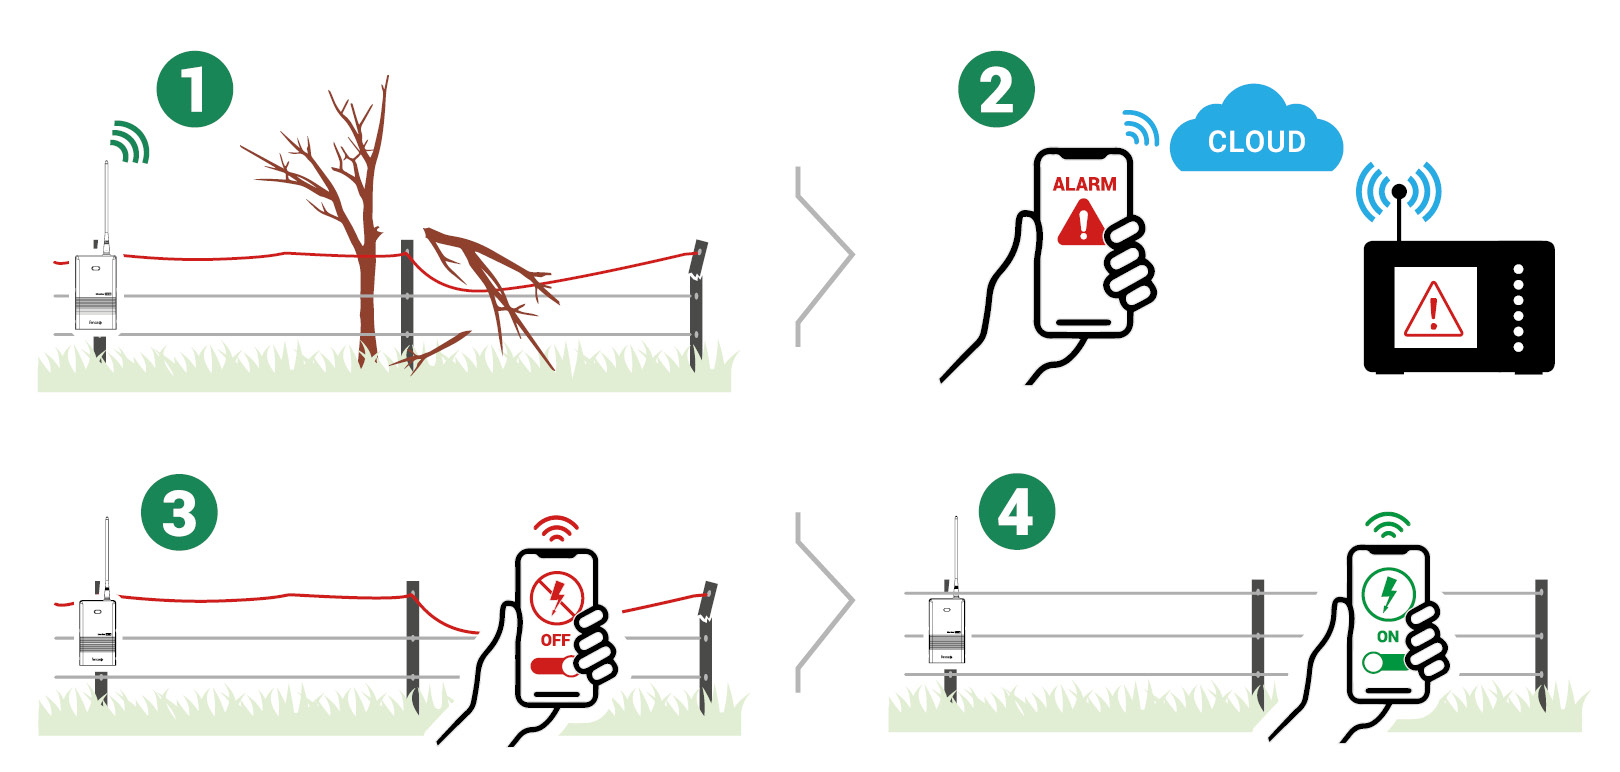
1. When the fence voltage starts dropping, the monitor responds immediately and sends information to the central gateway.
2. The gateway promptly assesses the situation and sends notification to your mobile phone and also via e-mail.
3. A notification will pop up on your mobile phone with information about the concerned fence. By simply using the mobile phone, turn off the energizer to the relevant fence via the fencee Cloud application.
4. After correcting the fault, use the mobile phone and with one click turn the energizer on again and check the voltage.
"If you have five monitors located in your fences, then you may imagine them as five different people tirelessly guarding five different sectors."
Jiří Stolín - Product specialist
Watch the video
A detailed presentation of Monitor MX10 in which you will find out what is included in the package and also what the monitor is able to do.
The monitor is fitted with a basic antenna that has a range of up to 10 km. To increase the signal transmission range between the monitor and the gateway, an external antennamay be used to increase the communication range up to a distance of 30 km. In the next article, you will learn how to install the external antenna to achieve the best transmission.
If you have any questions, please contact us. We will be happy to advise you on installing the control monitor or any other Smart Farm product.
Zasláním formuláře souhlasíte s uchováváním osobních údajů v souladu s ustanovením § 5, odst. 2 zákona č.101/2000 Sb., o ochraně osobních údajů, ve znění pozdějších předpisů. Souhlasíte s tím, aby Vaše osobní údaje, které tímto poskytujete společnosti VNT electronics s.r.o., byly zpracovány a vedeny v elektronické databázi, pouze pro účely výběrových řízení a maximálně po dobu 1 roku. Souhlas může být kdykoliv písemně nebo elektronicky odvolán.
We use cookies to analyze website traffic and functions, store your settings and personalize content and ads. We share information about how you use our website with our social media, advertising and analytics partners, who may be from outside the EU. Partners may combine this information with other information you have provided or obtained as a result of using their services. Detailed information
When you visit our website, we store information related to your visit in your browser, usually in the form of cookies. This is mainly information about your preferences, devices, or what you have been viewing. We do not generally collect information about your identity. We use information from cookies to tune our website to your satisfaction, to create relevant marketing campaigns and to share content on social networks. Here you can choose what cookies we can store in your browser. Detailed information
We must store these cookies in your browser in order for our website to be displayed correctly and to work properly. Necessary cookies are always allowed.
Functional cookies
Functional cookies help our site to provide you with a more convenient visit experience. They may be set up by us or the third party providers whose services we use on the site. If you do not enable cookies, some or all of these services may not work properly.
Analytical cookies
They help track the number of visitors and also the source of the traffic, which allows us to improve the performance of the site. With them, we can determine which sites are the most popular and which are not popular, and we can also track how visitors navigate the site. We only use aggregated data from which we do not know your identity. If we use third-party cookies, our partner may link this information to other data he may have about you because you use their services. If you do not enable cookies, we will not know when you visited our site.
Advertising cookies
These cookies can be set on our website by advertising partners. They can use them to profile your interests and show you ads on other sites. However, they do not store your personal information directly, but through the unique identifiers of the browser and Internet device. If you don't enable them, you'll see less targeted promotion on your site.